
How to Troubleshoot the WSJ‑M3 Control Handle
0%
How to Troubleshoot the WSJ‑M3 Control Handle in Mach3
This guide walks you through the most common fixes for the WSJ‑M3 wireless control handle. Follow the steps in order.
Important Prerequisite
The WSJ‑M3 control handle only works when the Mach3 software is already running on your computer. If the handle does not function properly, proceed with the steps below.
1. Replace the Batteries
Install fresh AA batteries (2 pieces) in the WSJ‑M3 handle. Low battery power is the most common cause of intermittent or completely unresponsive behavior. After replacing, turn the handle back on.
2. Check Complete Installation of Mach3 Plugins and Macro Files
Many users only copy ShuttlePro.dll but forget the macro files, causing some buttons on the handle to stop working. Please verify both items below:
2.1 Check the Plugin File
Open the Mach3\PlugIns\ folder and confirm that ShuttlePro.dll is present.
- If not: Carefully read the installation guide and copy the required
ShuttlePro.dllfile from the CD (or the settings package) into theMach3\PlugIns\folder.
2.2 Check Macro Files (Critical Step Often Overlooked)
Open the Mach3\macros\Mach3Mill\ folder and verify that macro files are in place.
- If not: Copy all files from the
macrofolder inside the settings package (ZIP) we sent you intoMach3\macros\Mach3Mill\. - Pay special attention to critical macros such as
M930.m1s(tool‑touch / Z‑axis probing). If missing, the Macro‑1 through Macro‑10 buttons on the handle will not execute their assigned functions.
3. Enable and Configure the ShuttlePro Plugin in Mach3
Simply placing the DLL in the folder is not enough; you must activate the plugin inside Mach3:
- Launch Mach3.
- Go to menu Config → Config Plugins.
- In the plugin list, locate ShuttlePro. Make sure there is a green checkmark next to it. If not, click the red X to turn it into a green checkmark.
- Click the yellow CONFIG button on the same row to open the plugin configuration interface.
- Assign custom macros to Macro‑1 through Macro‑10 (e.g., Custom Macro#1, Custom Macro#2…) and enter the corresponding M‑code numbers in the Macro Number field (e.g., Macro‑1 corresponds to Macro number 1).
- Click OK, then restart Mach3 for the changes to take effect.
Note: If you are using an older version of Mach3, it may not support plugins. We recommend upgrading to version 2.63 or later before proceeding.
4. Adjust the USB Receiver Position (Critical)
Try plugging the USB receiver into a different USB port on your computer to see if the problem persists.
- Desktop PCs: Plug the receiver directly into a USB port on the back panel of the computer case (i.e., the motherboard USB ports). Avoid front‑panel ports.
- Avoid USB extension cables and USB hubs (even powered ones). Some users reported that Mach3 recognized the device and the plugin showed a green checkmark, yet the handle remained unresponsive — switching to a rear motherboard port resolved the issue immediately.
- Keep the receiver exposed: For stable wireless signal, place the receiver outside the metal case. Do not install it inside the chassis, as the metal enclosure can shield the 433 MHz radio signal.
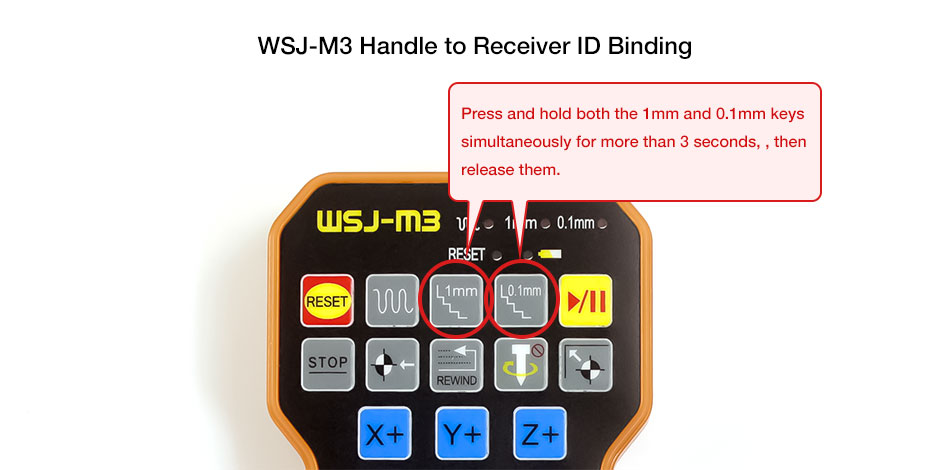
5. WSJ‑M3 Handle to Receiver ID Binding
If none of the above steps solve the problem, the wireless link between the handle and the receiver may not have been established. Perform the ID binding procedure:
- Locate the third and fourth buttons on the first row of the handle — the keys labeled 1mm and 0.1mm.
- Press and hold both the 1mm and 0.1mm keys simultaneously for more than 3 seconds, then release them.
- The ID binding between the handle and the receiver is now complete. The handle should operate normally.
- If the handle still does not respond, repeat the ID binding procedure once (sometimes the first attempt fails due to timing issues).
6. Still Not Working? Advanced Troubleshooting
If you have completed all five steps above and the handle remains unresponsive, follow this escalation path:
- Test another USB port: Try a different rear motherboard USB port to rule out a faulty or underpowered port.
- Reinstall Mach3 and redeploy files: Uninstall Mach3, reinstall it, then copy
ShuttlePro.dlland the macro files again as described in Step 2. Re‑enable the plugin in Mach3. - Test on a different computer: This will help determine whether the issue lies with your Mach3 installation or the system environment.
- Contact support: If the handle still fails on another computer, the hardware (handle or receiver) may be defective. Contact your dealer with your order number to request inspection or replacement.